
Choosing the Right Adapter for Security Cameras


Choosing the Right Adapter for Security Cameras
Lost the power cord for your security camera? Your first instinct might be to grab one from that drawer of old cables we all have. But wait. Using the wrong one isn’t just a gamble on whether it will work—it can permanently damage your camera or even create a safety risk. Let’s make sure you find the right one, the right way.
Think of an adapter less like a simple cord and more like a specific key for a lock. Trying a random one is like forcing a car key into your front door; even if the plug seems to fit, it could break the internal components. Every security camera power adapter is built to translate your home’s electricity into the precise power your specific device needs to operate safely.

Finding the correct adapter for your security camera doesn’t require technical expertise. You just need to know what to look for. This guide helps you find a safe replacement or extend a short cord, ensuring your investment is protected and your camera runs perfectly.
Summary
Choose an adapter by matching voltage exactly, using equal or higher amperage, and ensuring the barrel connector’s size and polarity match your camera. Prefer UL Listed (or similar) certified adapters for safety, and use DC extension cables—kept reasonably short—to extend reach while leaving the bulky adapter indoors. Watch for failing-adapter signs like rebooting, excessive heat, or no power. Follow the spec-check, search, and safety checks to buy a reliable replacement without needing the original brand.
Decoding the Power Label: Voltage (V) and Amperage (A)
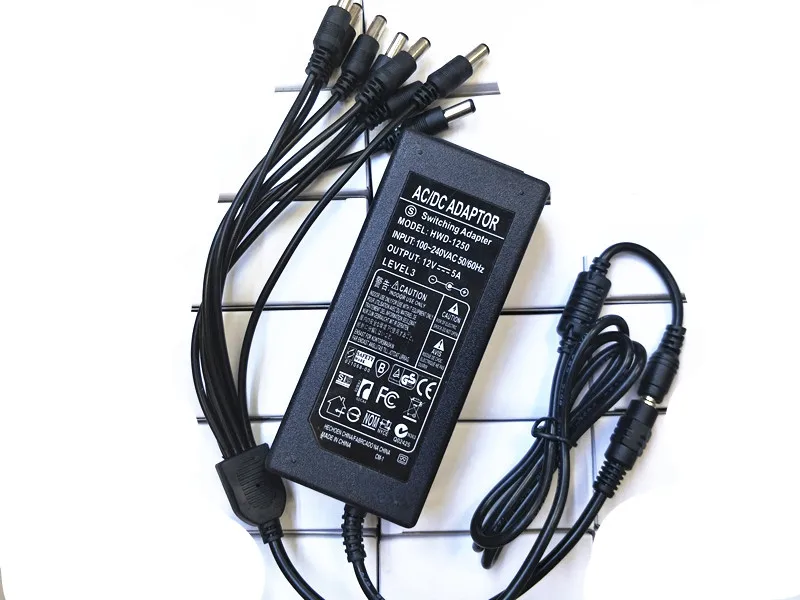
Flipping over a power adapter reveals a block of tiny text filled with symbols and numbers. It can look intimidating, but to safely power your camera, you only need to focus on two critical values: Voltage (V) and Amperage (A). Getting this power recipe right is essential for your camera’s safety and performance.
First, find the Voltage (V). Think of this as the electrical “pressure.” Your camera is designed for one specific pressure, and this number must be an exact match . Most security cameras use a 12V DC power adapter, but you must confirm what your model requires. Supplying too much voltage can permanently damage your camera, while providing too little means it won’t even turn on.
Next is Amperage (A), which is the amount of power the adapter can supply. Your camera only draws the amps it needs, so you have flexibility here. The rule is simple: your new adapter’s amperage must be equal to or higher than what your camera requires. It’s perfectly safe to use a 2A adapter for a 1A camera, but using a 1A adapter for a 2A camera will cause it to fail.
With these two rules—match Voltage exactly and meet or beat the Amperage—you can find the right electrical specs. These requirements are printed on the original power brick or on a label on the camera itself, often near the power port.

Why All Round Plugs Aren’t Created Equal: Matching the Connector
You’ve mastered the electrical recipe of Voltage and Amps, but the final hurdle is the plug itself. It’s a common trap to assume all round plugs are the same. These plugs, often called barrel connectors, come in various sizes. Trying to force the wrong one into your camera can damage the delicate power port, turning a simple problem into an expensive repair. When looking for a replacement, visually comparing the metal tip of the new adapter to your old one is the quickest way to spot a mismatch.
Beyond just the size, there’s a hidden detail called polarity. Think about putting batteries in a TV remote—if you get the plus (+) and minus (-) signs backward, it simply won’t work. It’s the same for your camera’s power. On the adapter’s label, you’ll find a small diagram with a + and – symbol pointing to the inner and outer parts of the plug’s icon. This polarity diagram must perfectly match the one on your camera or original adapter to ensure electricity flows correctly and safely.
Finding the right CCTV power supply is a three-part check: the exact Voltage, enough Amperage, and the correct security camera barrel connector type, including both its physical size and its polarity. Getting all three right is the only way to guarantee a safe and reliable power source for your camera.

Your 3-Step Guide to Buying the Perfect Replacement Adapter
Armed with the right electrical recipe, you’re ready to find a replacement. You don’t necessarily need an expensive, manufacturer-branded adapter. By following these steps, you can confidently buy a safe and compatible one from any reputable brand.
- The Spec Check: Write down the required Voltage (e.g., 12V), minimum Amperage (e.g., 1A), and polarity diagram (e.g., center-positive) from your camera or old adapter.
- The Search: Use these exact numbers and terms when searching on sites like Amazon or Google. A great search query looks like: “12V 1A power adapter center positive.”
- The Safety Check: On the product page, look for a key safety certification mark. The most common one in North America is UL Listed.
That “UL Listed” mark is your assurance that the adapter has been independently tested to meet strict safety standards, protecting your camera from damage and your home from fire hazards. It’s the final stamp of approval for a safe replacement.
The Power Cord Is Too Short: How to Safely Extend Your Camera’s Reach
It’s a classic home security headache: you find the perfect spot for your camera, only to realize the power cord won’t reach the outlet. Your first thought might be to grab a standard household extension cord, but that leaves the bulky adapter plug exposed to the elements or dangling awkwardly. Thankfully, there’s a much cleaner and safer solution.
For this job, you need a DC power extension cable . Instead of plugging your whole adapter into a bulky cord, this thin cable fits between your existing adapter and the camera. This setup lets you leave the large adapter plugged in safely indoors near the wall, while only the small, low-voltage wire runs to your camera. This is an ideal way to create a weatherproof outdoor camera power supply.
There is one important catch: length. Power slowly loses a bit of its “oomph” as it travels down a wire. Think of it like water pressure in a very long garden hose—it’s weaker at the far end. If the extension cable is excessively long, the power might be too weak by the time it reaches your camera, causing it to flicker, reboot, or not turn on at all.
As a general rule, try to stick to extensions under 25 feet to avoid issues. If you need a longer run, look for a heavy-duty cable or a kit specifically made for that distance.

Is Your Power Adapter Failing? 3 Telltale Signs to Check
Before you assume your expensive security camera is broken, take a close look at its humble power adapter. These small black boxes can fail over time and are often the true source of frustrating camera glitches. A faulty adapter can make a perfectly good camera seem unreliable or completely dead.
If you suspect an issue, check for these telltale signs. One of the most common symptoms is when a security camera keeps turning off and on. This often points to an amperage problem. When your camera’s night vision turns on, it needs a bigger “drink” of power. A weak adapter can’t supply it, causing the camera to starve and reboot.

Here are the top three red flags that point to a failing adapter:
- The Camera Keeps Rebooting: Especially when a feature like night vision kicks in, this often means the adapter can’t supply enough Amps.
- The Adapter Is Excessively Hot: A little warmth is normal, but if it’s too hot to comfortably touch, it’s a sign of internal failure.
- No Power at All: The power LED on the camera doesn’t light up, even when you’ve confirmed the outlet works with another device.
If you’re seeing any of these symptoms, the good news is that a replacement power supply for your security camera is a simple and inexpensive fix.
Powering Your Peace of Mind: A Final Checklist
Facing a lost or too-short power cord no longer has to be a frustrating dead end or a risky dive into a drawer of mystery cables. You can now look at any adapter and know instantly whether it’s a friend or a foe to your device, ensuring a safe and successful setup.

Stick to this essential checklist to get it right every time:
- DO: Match Voltage (V) exactly.
- DO: Use an adapter with equal or greater Amperage (A).
- DO: Check for the correct plug size and polarity.
- DO: Prioritize UL Listed (or similar) certified adapters for safety.
- DON’T: Use an adapter that gets excessively hot to the touch.
- DON’T: ‘Force’ a plug that doesn’t fit smoothly.
- DON’T: Guess—when in doubt, buy the official manufacturer’s replacement.
That little black box is the precise lifeline for your camera. This knowledge empowers you to safely power nearly any device in your home, trading uncertainty for confidence and ensuring your gear is always ready to do its job.

You May Also Like

Choosing the Best 4 Camera Security System

A Practical Guide to Security Cameras: Wired vs Wireless
